Layout Tips
Click on the product name to expand or collapse.
File Preparation & Color Settings
Color correct and soft proof your images prior to designing your layout. Learn more about Color.
Photoshop & InDesign Color Settings
Ensure your color settings are set as follows prior to starting your design project.- Working Spaces
RGB: Adobe RGB or sRGB - Color Management Policies
RGB: Preserve Embedded
CMYK: Preserve Embedded
Gray: Preserve Embedded - Conversion Options
Intent: Perceptual
Use Black Point Compensation: Checked
Photoshop Saving Settings - Order Files
Save your final layout with the following Photoshop settings prior to placing your order.- Flatten all layers in Photoshop - Layer > Flatten Image
- Save as JPG file with embedded color profile of Adobe RGB or sRGB - File > Save As.
- Image Options - Quality: 11 or 12 (Maximum)
- Format Options - Baseline Optimized
AsukaBook Maker & and InDesign - Image Saving Settings
Save your images with the following Photoshop settings prior to importing them into AsukaBook Maker or Adobe InDesign.- Flatten all layers in Photoshop - Layer > Flatten Image
- Save as JPG file with embedded color profile of Adobe RGB or sRGB - File > Save As.
- Image Options - Quality: 11 or 12 (Maximum)
- Format Options - Baseline Optimized
NeoClassic Book™
Faux Leather/Other Materials Cover Files
Designable Cover Files
Designable Presentation Case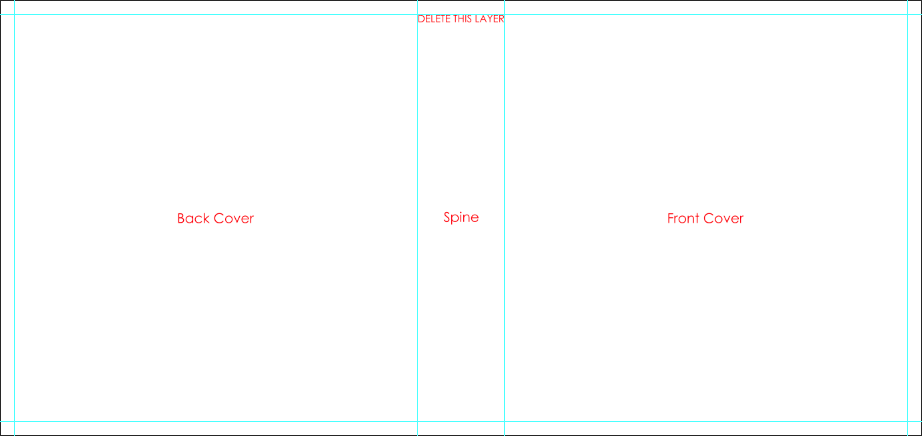
Designable Cover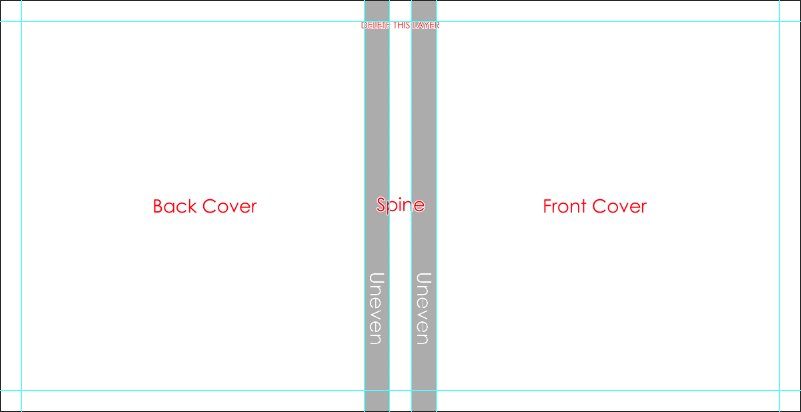
Layflat Pages
- 000001 - First single side
- 002003 - Sides/Spread 2-3
- .....
- 058059 - Sides/Spread 58-59
- 600000 - Last single side
- sleeve-box - Case file
Designable Cover Files
- 000000 - Cover file
- 000001 - First single side
- 002003 - Sides/Spread 2-3
- .....
- 058059 - Sides/Spread 58-59
- 600000 - Last single side
- sleeve-box - Case file
Designable Presentation Case
- The Case template includes an instructional layer. Turn off or delete this layer before saving your JPEG file.
- Turn on guides to view fold and spine guides
- Consider the direction of any spine text based on how the album will be stored ( vertically or lay flat ).
- Place images past the fold guide and aligned with canvas edge for a full bleed effect.
- Place images at least 1/4 inch away from the fold guides for a no-bleed effect.
- Place text/logo at least 1/4 inch away from the fold guides.
Designable Cover
- The Cover template includes an instructional layer. Turn off or delete this layer before saving your JPEG file.
- Turn on guides to view fold, spine, and divot guides.
- The divot may be marked by guidelines or a shaded area. It is not recommended to place text or important parts of an image on or near the divot area.
- Consider the direction of any spine text based on how the album will be stored ( vertically or lay flat ).
- Place images past the fold guide and aligned with canvas edge for a full bleed effect.
- Place images at least 1/4 inch away from the fold guides for a no-bleed effect.
- Place text/logo at least 1/4 inch away from the fold guides.
Layflat Pages
- Turn on guides to view center and trim guides.
- Place images past the trim guides for a full-bleed effect.
- Place images at least 1/4 inch away from the trim guides for a no-bleed effect.
- Place text/logo at least 1/4 inch away from the trim guides.
- Do not align images with the trim guides.
Crystal
Crystal and Crystal Board Files
Designable Cover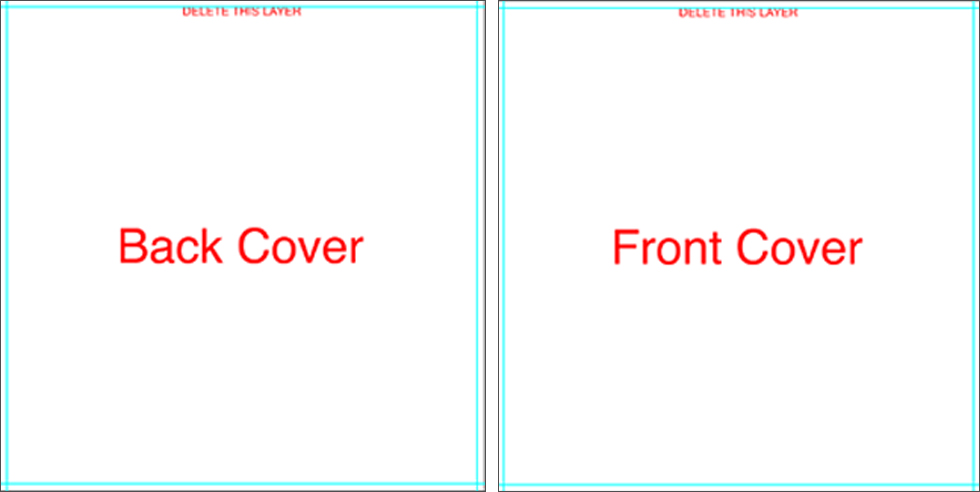
Vellum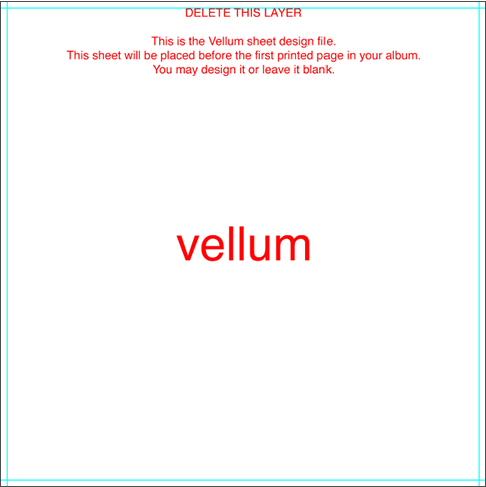
Layflat Pages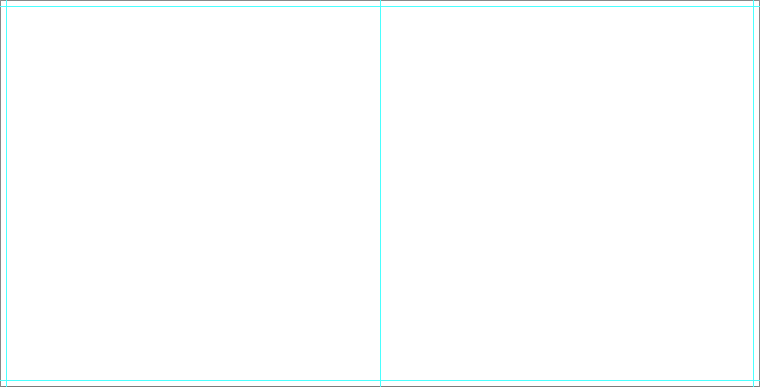
- 000001 - First single side
- 002003 - Sides/Spread 2-3
- .....
- 098099 - Sides/Spread 98-99
- 100000 - Last single side
- back-cover - Back Cover file
- front-cover - Front Cover file
- vellum - Vellum file
Designable Cover
- The Cover template includes an instructional layer. Turn off or delete this layer before saving your JPEG file.
- Turn on guides to view trim guides.
- Place images past the trim guide for a full bleed effect.
- Place images at least 1/4 inch away from the trim guides for a no-bleed effect.
- Place text/logo at least 1/4 inch away from the trim guides.
- Do not align images with the trim guide.
Vellum
- The Vellum template includes an instructional layer. Turn off or delete this layer before saving your JPEG file.
- Place images past the trim guides for a full-bleed effect.
- Place images at least 1/4 inch away from the trim guides for a no-bleed effect.
- Place text/logo at least 1/4 inch away from the trim guides.
- Do not align images with the trim guides.
Layflat Pages
- Turn on guides to view center and trim guides.
- Place images past the trim guides for a full-bleed effect.
- Place images at least 1/4 inch away from the trim guides for a no-bleed effect.
- Place text/logo at least 1/4 inch away from the trim guides.
- Do not align images with the trim guides.
Heirloom
Heirloom Files
Layflat Pages
- 000001 - First single side
- 002003 - Sides/Spread 2-3
- .....
- 098099 - Sides/Spread 98-99
- 100000 - Last single side
Layflat Pages
- Turn on guides to view center and trim guides.
- Place images past the trim guides for a full-bleed effect.
- Place images at least 1/4 inch away from the trim guides for a no-bleed effect.
- Place text/logo at least 1/4 inch away from the trim guides.
- Do not align images with the trim guides.
Art Layflat
Art Layflat Files
Designable Box Top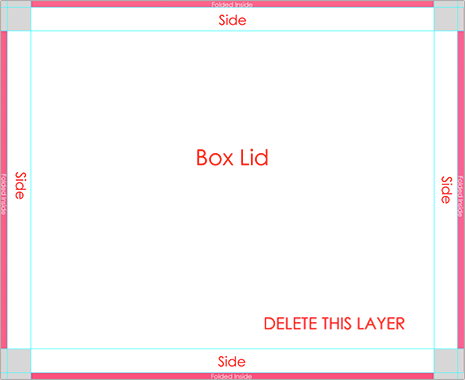
Designable Cover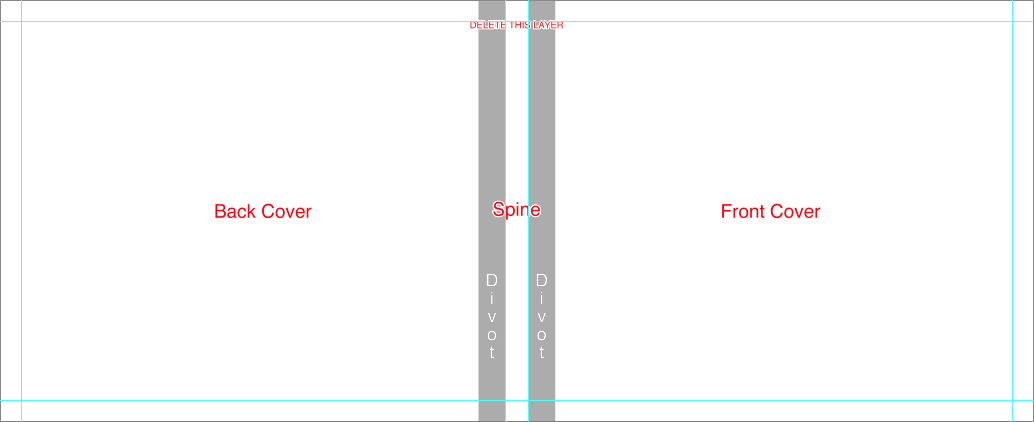
Layflat Pages
- 000000 - Cover file
- 000001 - First single side
- 002003 - Sides/Spread 2-3
- .....
- 098099 - Sides/Spread 98-99
- 100000 - Last single side
- Art-box - Case file
Designable Box Top
- The Case template includes an instructional layer. Turn off or delete this layer before saving your JPEG file.
- Turn on guides to view fold guides.
- Place images past the fold guide and aligned with canvas edge for a full bleed effect.
- Place images at least 1/4 inch away from the fold guides for a no-bleed effect.
- Place text/logo at least 1/4 inch away from the fold guides.
Designable Cover
- The Case template includes an instructional layer. Turn off or delete this layer before saving your JPEG file.
- Turn on guides to view fold, spine, and divot guides.
- The divot may be marked by guidelines or a shaded area. It is not recommended to place text or important parts of an image on or near the divot area.
- Consider the direction of any spine text based on how the album will be stored ( vertically or lay flat ).
- Place images past the fold guide and aligned with canvas edge for a full bleed effect.
- Place images at least 1/4 inch away from the fold guides for a no-bleed effect.
- Place text/logo at least 1/4 inch away from the fold guides.
Layflat Pages
- Turn on guides to view center and trim guides.
- Place images past the trim guides for a full-bleed effect.
- Place images at least 1/4 inch away from the trim guides for a no-bleed effect.
- Place text/logo at least 1/4 inch away from the trim guides.
- Do not align images with the trim guides.
Art Soft Cover
Art Soft Cover Files
Designable Cover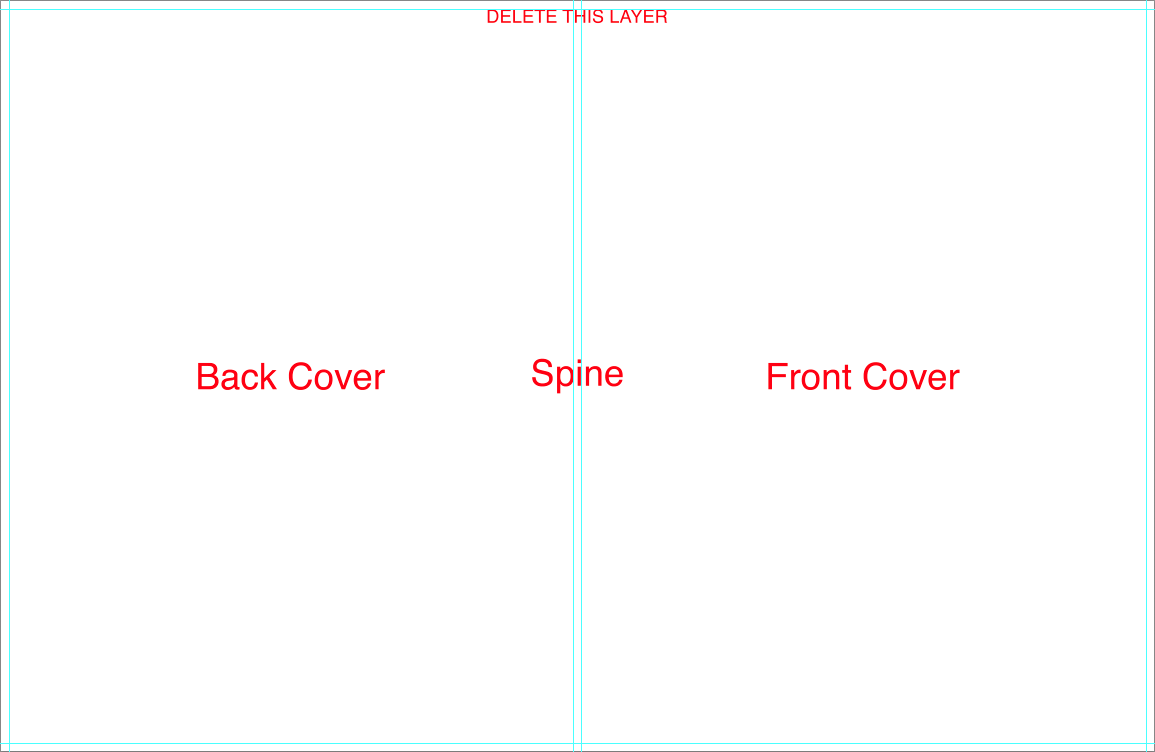
Perfect Bound Pages
- 000000 - Cover file
- 001002 - Sides/Spread 1-2
- 002003 - Sides/Spread 2-3
- .....
- 099100 - Sides/Spread 99-100
- Art-box - Case file
Designable Cover
- The Cover template includes an instructional layer. Turn off or delete this layer before saving your JPEG file.
- Turn on guides to view trim and spine guides.
- The divot may be marked by guidelines or a shaded area. It is not recommended to place text or important parts of an image on or near the divot area.
- Consider the direction of any spine text based on how the album will be stored ( vertically or lay flat ).
- Place images past the trim guide for a full bleed effect.
- Place images at least 1/4 inch away from the trim guides for a no-bleed effect.
- Place text/logo at least 1/4 inch away from the trim guides.
- Do not align images with the trim guide.
Perfect Bound Pages
- Turn on guides to view center/gutter and trim guides
- Place images past the trim guides for a full-bleed effect.
- Place images at least 1/4 inch away from the trim guides for a no-bleed effect.
- Place text/logo at least 1/4 inch away from the trim guides.
- Approximately 1/2 inch of image will be lost in the center/gutter. It is not recommended to place text or important parts of an image in the gutter area.
- Do not align images with the trim guide.
Zen Layflat Impact X
Zen Layflat Impact X Files
Designable Presentation Box
Layflat Pages
- 000000 - Case file
- 000001 - First single side
- 002003 - Sides/Spread 2-3
- .....
- 098099 - Sides/Spread 98-99
- 100000 - Last single side
Designable Presentation Box
- The Case template includes an instructional layer. Turn off or delete this layer before saving your JPEG file.
- Turn on guides to view fold and spine guides
- Consider the direction of any spine text based on how the album will be stored ( vertically or lay flat ).
- Place images past the fold guide and aligned with canvas edge for a full bleed effect.
- Place images at least 1/4 inch away from the fold guides for a no-bleed effect.
- Place text/logo at least 1/4 inch away from the fold guides.
Layflat Pages
- Turn on guides to view center and trim guides.
- Place images past the trim guides for a full-bleed effect.
- Place images at least 1/4 inch away from the trim guides for a no-bleed effect.
- Place text/logo at least 1/4 inch away from the trim guides.
- Do not align images with the trim guides.
Zen Layflat Impact
Zen Layflat Impact Files
Designable Presentation Box
Layflat Pages
- 000000 - Case file
- 000001 - First single side
- 002003 - Sides/Spread 2-3
- .....
- 098099 - Sides/Spread 98-99
- 100000 - Last single side
Designable Presentation Box
- The Case template includes an instructional layer. Turn off or delete this layer before saving your JPEG file.
- Turn on guides to view fold and spine guides
- Consider the direction of any spine text based on how the album will be stored ( vertically or lay flat ).
- Place images past the fold guide and aligned with canvas edge for a full bleed effect.
- Place images at least 1/4 inch away from the fold guides for a no-bleed effect.
- Place text/logo at least 1/4 inch away from the fold guides.
- Do not align images with the fold guide.
Layflat Pages
- Turn on guides to view center and trim guides.
- Place images past the trim guides for a full-bleed effect.
- Place images at least 1/4 inch away from the trim guides for a no-bleed effect.
- Place text/logo at least 1/4 inch away from the trim guides.
- Do not align images with the trim guides.
Zen Layflat EXD
Zen Layflat EXD Files
Designable Slide-In Case
Designable Cover & Jacket
Layflat Pages
- 000000 - Cover file
- 000001 - First single side
- 002003 - Sides/Spread 2-3
- .....
- 098099 - Sides/Spread 98-99
- 100000 - Last single side
- excase - Case file
Designable Slide-In Case
- The Case template includes an instructional layer. Turn off or delete this layer before saving your JPEG file.
- Turn on guides to view fold and spine guides.
- Consider the direction of any spine text based on how the album will be stored ( vertically or lay flat ).
- Place images past the fold guide and aligned with canvas edge for a full bleed effect.
- Place images at least 1/4 inch away from the fold guides for a no-bleed effect.
- Place text/logo at least 1/4 inch away from the fold guides.
Designable Cover & Jacket
- The Cover and Jacket are printed from the same file.
- The Cover and Jacket template includes an instructional layer. Turn off or delete this layer before saving your JPEG file.
- Turn on guides to view fold/trim, spine, and center guides.
- The divot may be marked by guidelines or a shaded area. It is not recommended to place text or important parts of an image on or near the divot area.
- Consider the direction of any spine text based on how the album will be stored ( vertically or lay flat ).
- Place images past the fold/trim guides.
- Place images least 1/4 inch away from the fold/trim guides for a no-bleed effect.
- Place text/logo at least 1/4 inch away from the fold/trim guides.
- Do not align images with trim/fold guide.
Layflat Pages
- Turn on guides to view center and trim guides.
- Place images past the trim guides for a full-bleed effect.
- Place images at least 1/4 inch away from the trim guides for a no-bleed effect.
- Place text/logo at least 1/4 inch away from the trim guides.
- Do not align images with the trim guide.
Zen Layflat EX
Zen Layflat EX Files
Designable Cover & Jacket
Layflat Pages
- 000000 - Cover file
- 000001 - First single side
- 002003 - Sides/Spread 2-3
- .....
- 098099 - Sides/Spread 98-99
- 100000 - Last single side
Designable Cover & Jacket
- The Cover and Jacket are printed from the same file.
- The Cover and Jacket template includes an instructional layer. Turn off or delete this layer before saving your JPEG file.
- Turn on guides to view fold/trim, spine, and center guides.
- The divot may be marked by guidelines or a shaded area. It is not recommended to place text or important parts of an image on or near the divot area.
- Consider the direction of any spine text based on how the album will be stored ( vertically or lay flat ).
- Place images past the fold/trim guides.
- Place images least 1/4 inch away from the fold/trim guides for a no-bleed effect.
- Place text/logo at least 1/4 inch away from the fold/trim guides.
- Do not align images with trim/fold guide.
Layflat Pages
- Turn on guides to view center and trim guides.
- Place images past the trim guides for a full-bleed effect.
- Place images at least 1/4 inch away from the trim guides for a no-bleed effect.
- Place text/logo at least 1/4 inch away from the trim guides.
- Do not align images with the trim guide.
Zen Layflat Hard Cover
Zen Layflat Hard Cover Files
Designable Cover
Layflat Pages
- 000000 - Cover file
- 000001 - First single side
- 002003 - Sides/Spread 2-3
- .....
- 098099 - Sides/Spread 98-99
- 100000 - Last single side
Designable Cover
- The Cover template includes an instructional layer. Turn off or delete this layer before saving your JPEG file.
- Turn on guides to view fold, spine, and divot guides.
- The divot may be marked by guidelines or a shaded area. It is not recommended to place text or important parts of an image on or near the divot area.
- Consider the direction of any spine text based on how the album will be stored ( vertically or lay flat ).
- Place images past the fold guide and aligned with canvas edge for a full bleed effect.
- Place images at least 1/4 inch away from the fold guides for a no-bleed effect.
- Place text/logo at least 1/4 inch away from the fold guides.
- Do not align images with the fold guide.
Layflat Pages
- Turn on guides to view center and trim guides.
- Place images past the trim guides for a full-bleed effect.
- Place images at least 1/4 inch away from the trim guides for a no-bleed effect.
- Place text/logo at least 1/4 inch away from the trim guides.
- Do not align images with the trim guides.
Book Bound Hard Cover
Book Bound Hard Cover Files
Designable Cover
Perfect Bound Pages
- 000000 - Cover file
- 000001 - First single side
- 002003 - Sides/Spread 2-3
- .....
- 098099 - Sides/Spread 98-99
- 100000 - Last single side
Designable Cover
- The Cover template includes an instructional layer. Turn off or delete this layer before saving your JPEG file.
- Turn on guides to view fold and spine guides.
- The divot may be marked by guidelines or a shaded area. It is not recommended to place text or important parts of an image on or near the divot area.
- Consider the direction of any spine text based on how the album will be stored ( vertically or lay flat ).
- Place images past the fold guide and aligned with canvas edge for a full bleed effect.
- Place images at least 1/4 inch away from the fold guides for a no-bleed effect.
- Place text/logo at least 1/4 inch away from the fold guides.
- Do not align images with the fold guide.
Perfect Bound Pages
- Turn on guides to view center and trim guides
- Place images past the trim guides for a full-bleed effect.
- Place images at least 1/4 inch away from the trim guides for a no-bleed effect.
- Place text/logo at least 1/4 inch away from the trim guides.
- Approximately 1/2 inch of image will be lost in the center/gutter. It is not recommended to place text or important parts of an image in the gutter area.
- Do not align images with the trim guide.
Book Bound Soft Cover
Book Bound Soft Cover Files
Designable Cover
Perfect Bound Pages
- 000000 - Cover file
- 000001 - First single side
- 002003 - Sides/Spread 2-3
- .....
- 098099 - Sides/Spread 98-99
- 100000 - Last single side
Designable Cover
- The Cover template includes an instructional layer. Turn off or delete this layer before saving your JPEG file.
- Turn on guides to view spine and trim guides.
- The divot may be marked by guidelines or a shaded area. It is not recommended to place text or important parts of an image on or near the divot area.
- Consider the direction of any spine text based on how the album will be stored ( vertically or lay flat ).
- Place images past the fold guide and aligned with canvas edge for a full bleed effect.
- Place images at least 1/4 inch away from the fold guides for a no-bleed effect.
- Place text/logo at least 1/4 inch away from the fold guides.
- Do not align images with the fold guide.
Perfect Bound Pages
- Turn on guides to view center and trim guides
- Place images past the trim guides for a full-bleed effect.
- Place images at least 1/4 inch away from the trim guides for a no-bleed effect.
- Place text/logo at least 1/4 inch away from the trim guides.
- Approximately 1/2 inch of image will be lost in the center/gutter. It is not recommended to place text or important parts of an image in the gutter area.
- Do not align images with the trim guide.
Vista Layflat
Vista Layflat Files
Designable Cover
Layflat Pages
- 000000 - Cover file
- 001002 - Sides/Spread 1-2 or First Spread
- 003004 - Sides/Spread 3-4
- .....
- 017018 - Sides/Spread 17-18
- 019020 - Sides/Spread 19-20 or Last Spread
Designable Cover
- The Cover template includes an instructional layer. Turn off or delete this layer before saving your JPEG file.
- Turn on guides to view fold, spine and divot guides.
- The divot may be marked by guidelines or a shaded area. It is not recommended to place text or important parts of an image on or near the divot area.
- Consider the direction of any spine text based on how the album will be stored ( vertically or lay flat ).
- Place images past the fold guide and aligned with canvas edge for a full bleed effect.
- Place images at least 1/4 inch away from the fold guides for a no-bleed effect.
- Place text/logo at least 1/4 inch away from the fold guides.
- Do not align images with the fold guide.
Layflat Pages
- Turn on guides to view center and trim guides.
- Place images past the trim guides for a full-bleed effect.
- Place images at least 1/4 inch away from the trim guides for a no-bleed effect.
- Place text/logo at least 1/4 inch away from the trim guides.
- Do not align images with the trim guide.
Curve
Curve Files
Designable Cover
Layflat Pages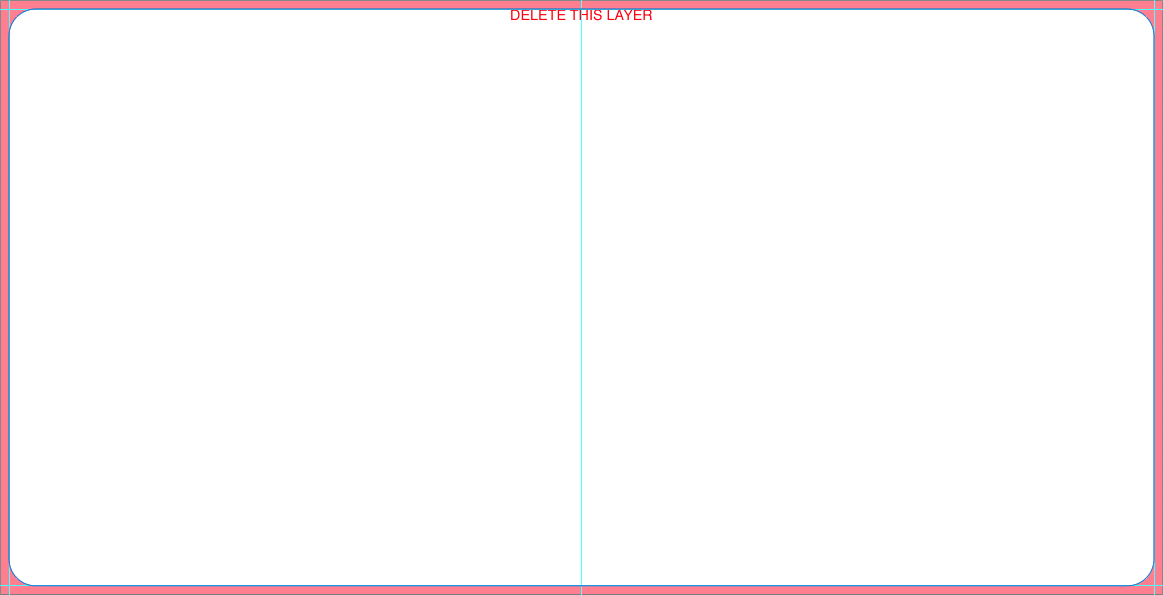
- 000000 - Cover file
- 001002 - Sides/Spread 1-2 or First Spread
- 003004 - Sides/Spread 3-4
- .....
- 009010 - Sides/Spread 9-10
- 011012 - Sides/Spread 11-12 or Last Spread
Designable Cover
- The Blank Templates include an instructional layer. Turn off or delete this layer before saving your JPEG file.
- Turn on guides to view trim and spine guides.
- Consider the direction of any spine text based on how the album will be stored ( vertically or lay flat ).
- Place images past the trim guides for a full bleed effect.
- Place images at least 1/4 inch away from the trim guides for a no-bleed effect.
- Place text/logo at least 1/4 inch away from the trim guides.
- Do not align images with the trim guides.
Layflat Pages
- Turn on guides to view center and trim guides.
- Place images past the trim guides for a full-bleed effect.
- Place images at least 1/4 inch away from the trim guides for a no-bleed effect.
- Place text/logo at least 1/4 inch away from the trim guides.
- Do not align images with the trim guides.
Presentation Books
Presentation Book Files
Designable Media Holder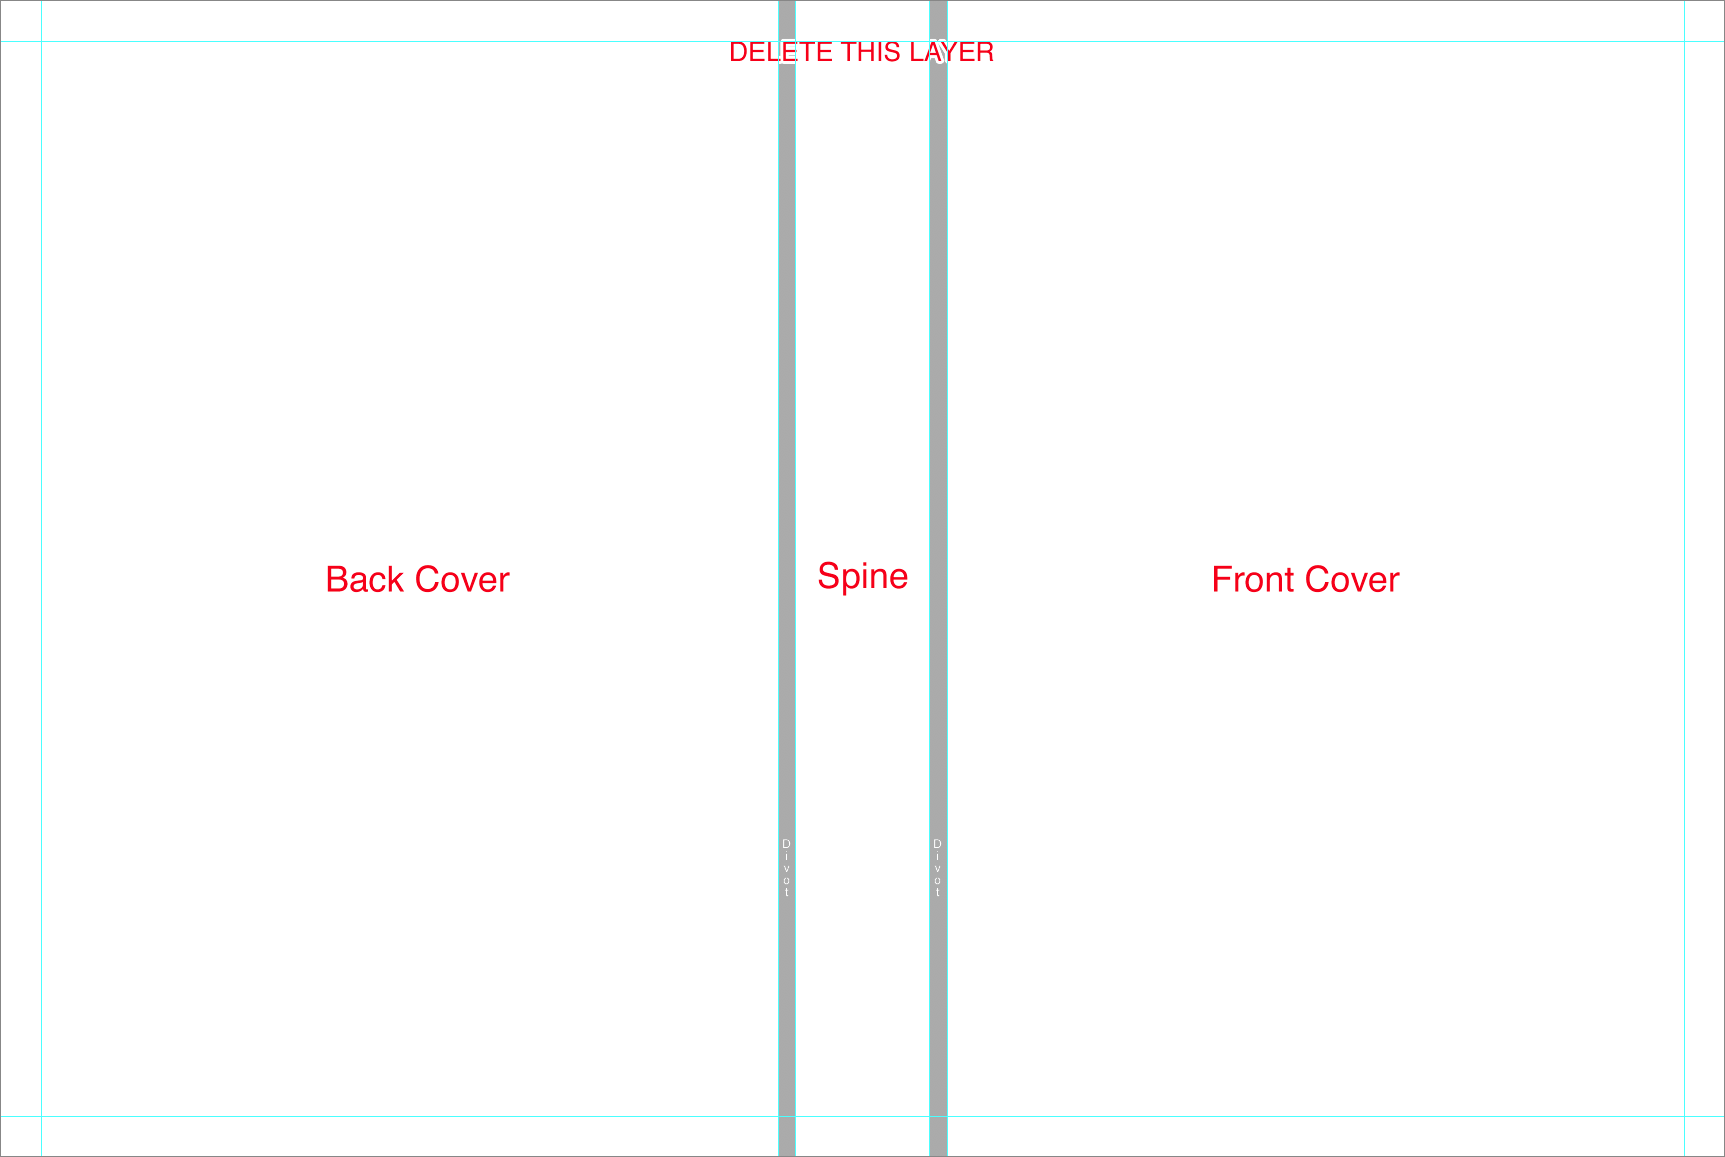
Designable Book Cover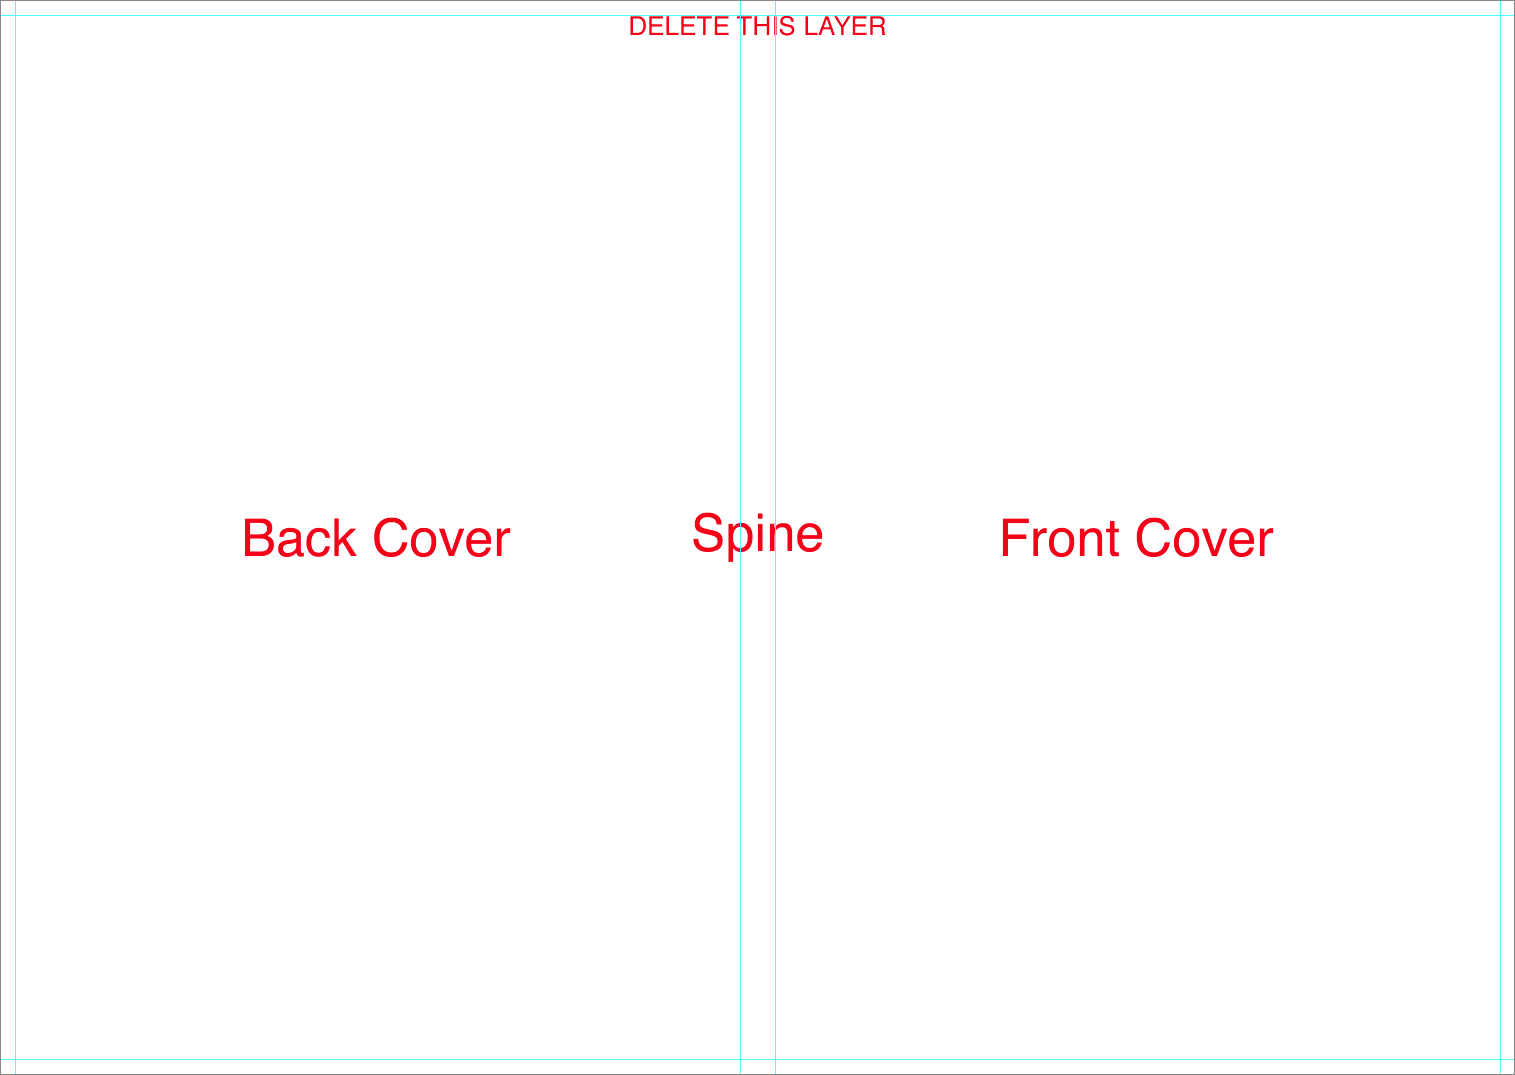
Layflat Pages
- 000000 - Cover file
- 000001 - First single side
- 002003 - Sides/Spread 2-3
- .....
- 010011 - Sides/Spread 10-11
- 012000 - Last single side
- USB-cover - Media Holder Cover
Designable Media Holder
- The Media Holder template includes an instructional layer. Turn off or delete this layer before saving your JPEG file.
- Turn on guides to view fold, spine, and divot guides
- Consider the direction of any spine text based on how the album will be stored ( vertically or lay flat ).
- Place images past the fold guide and aligned with canvas edge for a full bleed effect.
- Place images at least 1/4 inch away from the fold guides for a no-bleed effect.
- Place text/logo at least 1/4 inch away from the fold guides.
- Do not align images with the fold guide.
Designable Book Cover
- The Cover template includes an instructional layer. Turn off or delete this layer before saving your JPEG file.
- Turn on guides to view fold and spine guides.
- The divot may be marked by guidelines or a shaded area. It is not recommended to place text or important parts of an image on or near the divot area.
- Consider the direction of any spine text based on how the album will be stored ( vertically or lay flat ).
- Place images past the fold guide and aligned with canvas edge for a full bleed effect.
- Place images at least 1/4 inch away from the fold guides for a no-bleed effect.
- Place text/logo at least 1/4 inch away from the fold guides.
- Do not align images with the fold guide.
Layflat Pages
- Turn on guides to view center and trim guides.
- Place images past the trim guides for a full-bleed effect.
- Place images at least 1/4 inch away from the trim guides for a no-bleed effect.
- Place text/logo at least 1/4 inch away from the trim guides.
- Do not align images with the trim guide.
Folio & Tri Folio
Folio Files
Designable Cover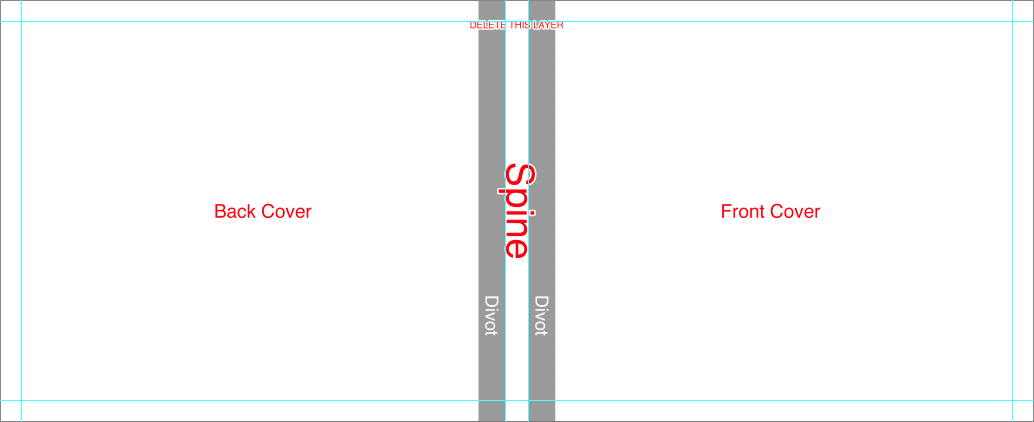
Inside Folio
Tri Folio Files
Designable Cover
Inside Tri Folio
- 000000 - Cover file
- 000001 - Inside folio
Designable Cover
- The Cover template includes an instructional layer. Turn off or delete this layer before saving your JPEG file.
- Turn on guides to view fold, spine, and divot guides
- Consider the direction of any spine text based on how the album will be stored ( vertically or lay flat ).
- Place images past the fold guide and aligned with canvas edge for a full bleed effect.
- Place images at least 1/4 inch away from the fold guides for a no-bleed effect.
- Place text/logo at least 1/4 inch away from the fold guides.
- Do not align images with the fold guide.
Inside Folio
- Turn on guides to view center and trim guides.
- Place images past the trim guides for a full-bleed effect.
- Place images at least 1/4 inch away from the trim guides for a no-bleed effect.
- Place text/logo at least 1/4 inch away from the trim guides.
- Do not align images with the trim guide.
Tri Folio Files
- 000000 - Cover file
- 000001 - Inside folio
Designable Cover
- The Cover template includes an instructional layer. Turn off or delete this layer before saving your JPEG file.
- Turn on guides to view fold, spine, and divot guides.
- The divot may be marked by guidelines or a shaded area. It is not recommended to place text or important parts of an image on or near the divot area.
- Consider the direction of any spine text based on how the album will be stored ( vertically or lay flat ).
- Place images past the fold guide and aligned with canvas edge for a full bleed effect.
- Place images at least 1/4 inch away from the fold guides for a no-bleed effect.
- Place text/logo at least 1/4 inch away from the fold guides.
- Do not align images with the fold guide.
Inside Tri Folio
- Turn on guides to view fold and trim guides.
- Place images past the trim guides for a full-bleed effect.
- Place images at least 1/4 inch away from the trim guides for a no-bleed effect.
- Place text/logo at least 1/4 inch away from the trim guides.
- Do not align images with the trim guide.