
Design & General Process
Design your custom album with the blank templates.
Step 1 - DOWNLOAD & INSTALL THE ABID TOOL
Download and install the ABiD Tool.
Step 2 - CREATE BLANK TEMPLATES
Run the ABiD Tool and create blank templates for the product of choice.
Step 3 - DESIGN YOUR LAYOUT
Place images and design the layout. Refer to the File Preparation for file saving settings and accepted formats.
• Color correct and edit your images prior to designing your layout.
• Soft proof your images with our printer profile to check any color changes prior to finalizing your layout. Learn more about Color.
• Color correct and edit your images prior to designing your layout.
• Soft proof your images with our printer profile to check any color changes prior to finalizing your layout. Learn more about Color.
Step 4 - EXPORT & REVIEW PRINT READY FILES
Export high resolution JPG files of each layout, and review at 100% scale for accuracy, quality, color & typographical errors prior to placing an order.
Step 5 - PLACE ORDER
Upload, sync with the AlbumLayout Proofing website, and place order by following the steps found in Export, Proof & Order.
Step 6 - SYNC WITH THE ALBUMLAYOUT PROOFING WEBSITE
Optional Step - Upload your album layout to the AlbumLayout Proofing website to share with your clients and get their approval. You can also download a slideshow version of your layout (MP4) to share and post on your website and social media channels. Refer to the AlbumLayout Proofing website User Guide for instructions.
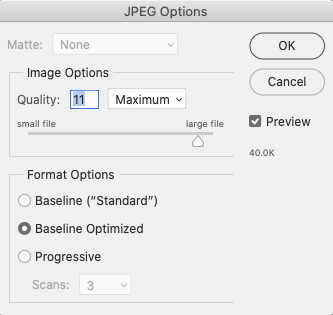
JPG SAVING SETTINGS
Save your images with the following Photoshop settings prior to importing into AsukaBook Maker.
- Retouch/Enhance image.
- Flatten all layers - Layer > Flatten Image
- Save as JPG file with embedded color profile of AdobeRGB or sRGB - File > Save As.
- Image Options - Quality: 11 or 12 (Maximum)
- Format Options - Baseline Optimized
Step 1 - CREATE BLANK TEMPLATES
All files specific to the product of choice will be created in a .indb format. Each set of blank template is set up with the appropriate size, resolution, color space, filename, and guide locations. Do not change any of the template specifications, including file names.
- Launch InDesign
- Click on the ABId Menu.
- Click on New Blank Templates
- Select the product details and click OK.
- Create or select an empty folder to save the templates to and click Open.
• Note that a new blank folder is necessary for each project. - Enter a name for this design project and click OK.
• Note that all necessary files will be created and saved in the same folder. It is essential to keep all files in the same location. - The contents of the book file project (.indb), including your Pages, Case, and Cover templates, if applicable, will open in the design panel.
Step 2 - DESIGN
Design a custom layout.
DO NOT open a document file directly (i.e. Pages.indd or Cover.indd or Case.indd). Always open the book file project first (.indb), and individual book parts once the project is open in InDesign.
• Color correct and soft proof your images prior to designing your layout. Learn more about Color.
- Double-click on Case, Cover or Pages on the book panel to open.
- Place images onto the blank template.
- Size and position at desired location.
- Add text, sloppy borders, masks, illustrations, background color, and apply any other image effects.
- Save your project. As with any project, it is recommended to save often.
DO NOT open a document file directly (i.e. Pages.indd or Cover.indd or Case.indd). Always open the book file project first (.indb), and individual book parts once the project is open in InDesign.
• Color correct and soft proof your images prior to designing your layout. Learn more about Color.
Step 3 - EXPORT JPG FILES
Once your layout is complete, export a high resolution JPG of each file by following the steps found in Export, Proof & Order.
Step 4 - PLACE ORDER
Upload, sync with the AlbumLayout Proofing website, and place order by following the steps found in Export, Proof & Order.